Embeddable FinchPay Calculator
Please reach out to our dedicated team to acquire your unique partnerId and
secret key.
How to use?
- Incorporate the provided CSS and JS bundles into your webpage.
- Insert a
divelement with theid="finch-widget-container"at the desired location to display the widget. - Execute the
window.__initFinchCalc(config)function, ensuring that the config object includespartnerId.
Config
| Parameter | Description | Required | Type | Default value |
|---|---|---|---|---|
partnerId | Your partner ID provided for integration. | True | string | – |
fromAmount | Fiat amount (ex: 1000) | False | string / number | 200 |
fromAsset | Fiat currency (ex: EUR / USD) | False | string | – |
toAsset | Asset ticker (ex: BTC / USDT) | False | string | – |
toAssetChain | Asset chain / network (ex: undefined / ERC-20) | False | string | – |
getWalletAddress | Async function for pre-filling the wallet address. It takes an object with asset and chain parameters, and returns a promise that resolves to an object with wallet and sign properties. The sign property is generated using the HMAC-SHA256 algorithm with the wallet address and secret key. Example: {asset: "USDT", chain: "TRC-20"} or {asset: "BTC"} → {wallet: "your_wallet_address", sign: "sign"}. | False | function | – |
getExternalId | Async function to retrieve the transaction's external ID. It takes no parameters and returns a promise that resolves to a unique 36-character UUID string. | False | function | – |
hideFees | Set to true to hide fees information in the widget. | False | boolean | false |
variant | Property used to set the visual calculator mode (can be "default", "small", or undefined). | False | string | "default" |
Typescript Definition
declare global {
  interface IFinchWidgetOptions {
    partnerId: string;
    fromAmount?: number;
    fromAsset?: string;
    toAsset?: string;
    toAssetChain?: string;
    hideFees?: boolean;
    variant?: "default" | "small";
    paymentMethodRoute?: string;
    getWalletAddress?: (props: {
      asset: string;
      chain?: string;
    }) => Promise<{ wallet: string; sign: string }>;
    getExternalId?: () => Promise<string>;
  }

  interface Window {
    __initFinchCalc: (options: IFinchWidgetOptions) => void;
  }
}
Examples
Plain HTML Integration
- Include the provided stylesheet within the
<head>tag of your HTML page:
<link rel="stylesheet" href="https://calc.finchpay.io/bundle.css" />- Insert the initialization script before code from next step:
<script>
  function initFCalc() {
    window.__initFinchCalc({
      partnerId: "your_partner_id",
    });
  }
</script>- Incorporate the JS bundle within the
<head>or<body>section of your website:
<script
  async
  src="https://calc.finchpay.io/bundle.js"
  onload="initFCalc()"
></script>- Add an empty div element with
id="finch-widget-container"within your webpage where you intend to display the calculator:
<div id="finch-widget-container"></div>Next.js
import Head from "next/head";
import Script from "next/script";

export default function PageWithWidget() {
  const handleLoad = () => {
    window.__initFinchCalc({
      partnerId: "your_partner_id",
    });
  };

  return (
    <>
      <Head>
        <link rel="stylesheet" href="https://calc.finchpay.io/bundle.css" />
      </Head>

      <Script
        strategy="afterInteractive"
        src="https://calc.finchpay.io/bundle.js"
        onReady={handleLoad}
      />

      <div id="finch-widget-container" />
    </>
  );
}
Pre-filled wallet flow
To enable the pre-filled wallet flow, you need to provide the getWalletAddress function in the 2 step. This function retrieves the wallet address and sign from an API endpoint (on your environment) and returns them as an object.
Here's an example implementation of the getWalletAddress function in JavaScript:
<script>
  async function getWalletAddress({ asset, chain }) {
    const res = await fetch(`your-endpoint?asset=${asset}&chain=${chain}`);
    const { wallet, sign } = await res.json();

    return { wallet, sign };
  }

  function initFCalc() {
    window.__initFinchCalc({
      partnerId: "your_partner_id",
      getWalletAddress,
    });
  }
</script>
In this example, the getWalletAddress function makes an asynchronous request to an API endpoint (your-api-domain/endpoint) with the provided asset and chain parameters. It expects the response to be in JSON format, containing the wallet and sign values. These values are then returned as an object.
Additionally, here's a minimal example demonstrating how to generate a sign using Node.js on a backend:
const CryptoJS = require("crypto-js");

function getSign (walletAddress, secret) => {
  return CryptoJS.HmacSHA256(walletAddress, secret);
};

const walletAddress = "your_wallet_address";
const secret = "your_secret";

getSign(walletAddress, secret);
And the example of the express function:
import { Request, Response } from 'express';
import CryptoJS from 'crypto-js';

function getSign (walletAddress: string, walletExtra?: string, secret: string) {
  return CryptoJS.HmacSHA256(walletAddress, secret).toString();
};

app.get('/get-signature', (req: Request, res: Response) => {
  const { walletAddress, walletExtra, secret } = req.query as { walletAddress: string; walletExtra?: string; secret: string };

  const sign = getSign(walletAddress, secret);
  res.send(sign);
});
External UUID
An external UUID is a unique identifier used to distinguish transactions or entities across systems. This UUID is generated externally and passed to APIs or webhooks for reference and tracking purposes.
In this example, the getExternalId function makes an asynchronous request to an API endpoint (your-api-domain/external-id-endpoint). It expects the response to be in string format, containing the unique 36 characters long UUID.
Client code:
<script>
  async function getExternalId() {
    const res = await fetch(`/generate-uuid`);
    const uuid = await res.text();

    return uuid;
  }

  function initFCalc() {
    window.__initFinchCalc({
      partnerId: "your_partner_id",
      getExternalId,
    });
  }
</script>
Server code:
import { Request, Response } from 'express';
import { v4 as uuidv4 } from 'uuid';

app.get('/generate-uuid', (req: Request, res: Response) => {
  const uuid = uuidv4();
  res.send(uuid);
});
Customization
-
Mini Widget Version: To display a compact version of the widget, include hideFees: true in the configuration object to hide fee details.
-
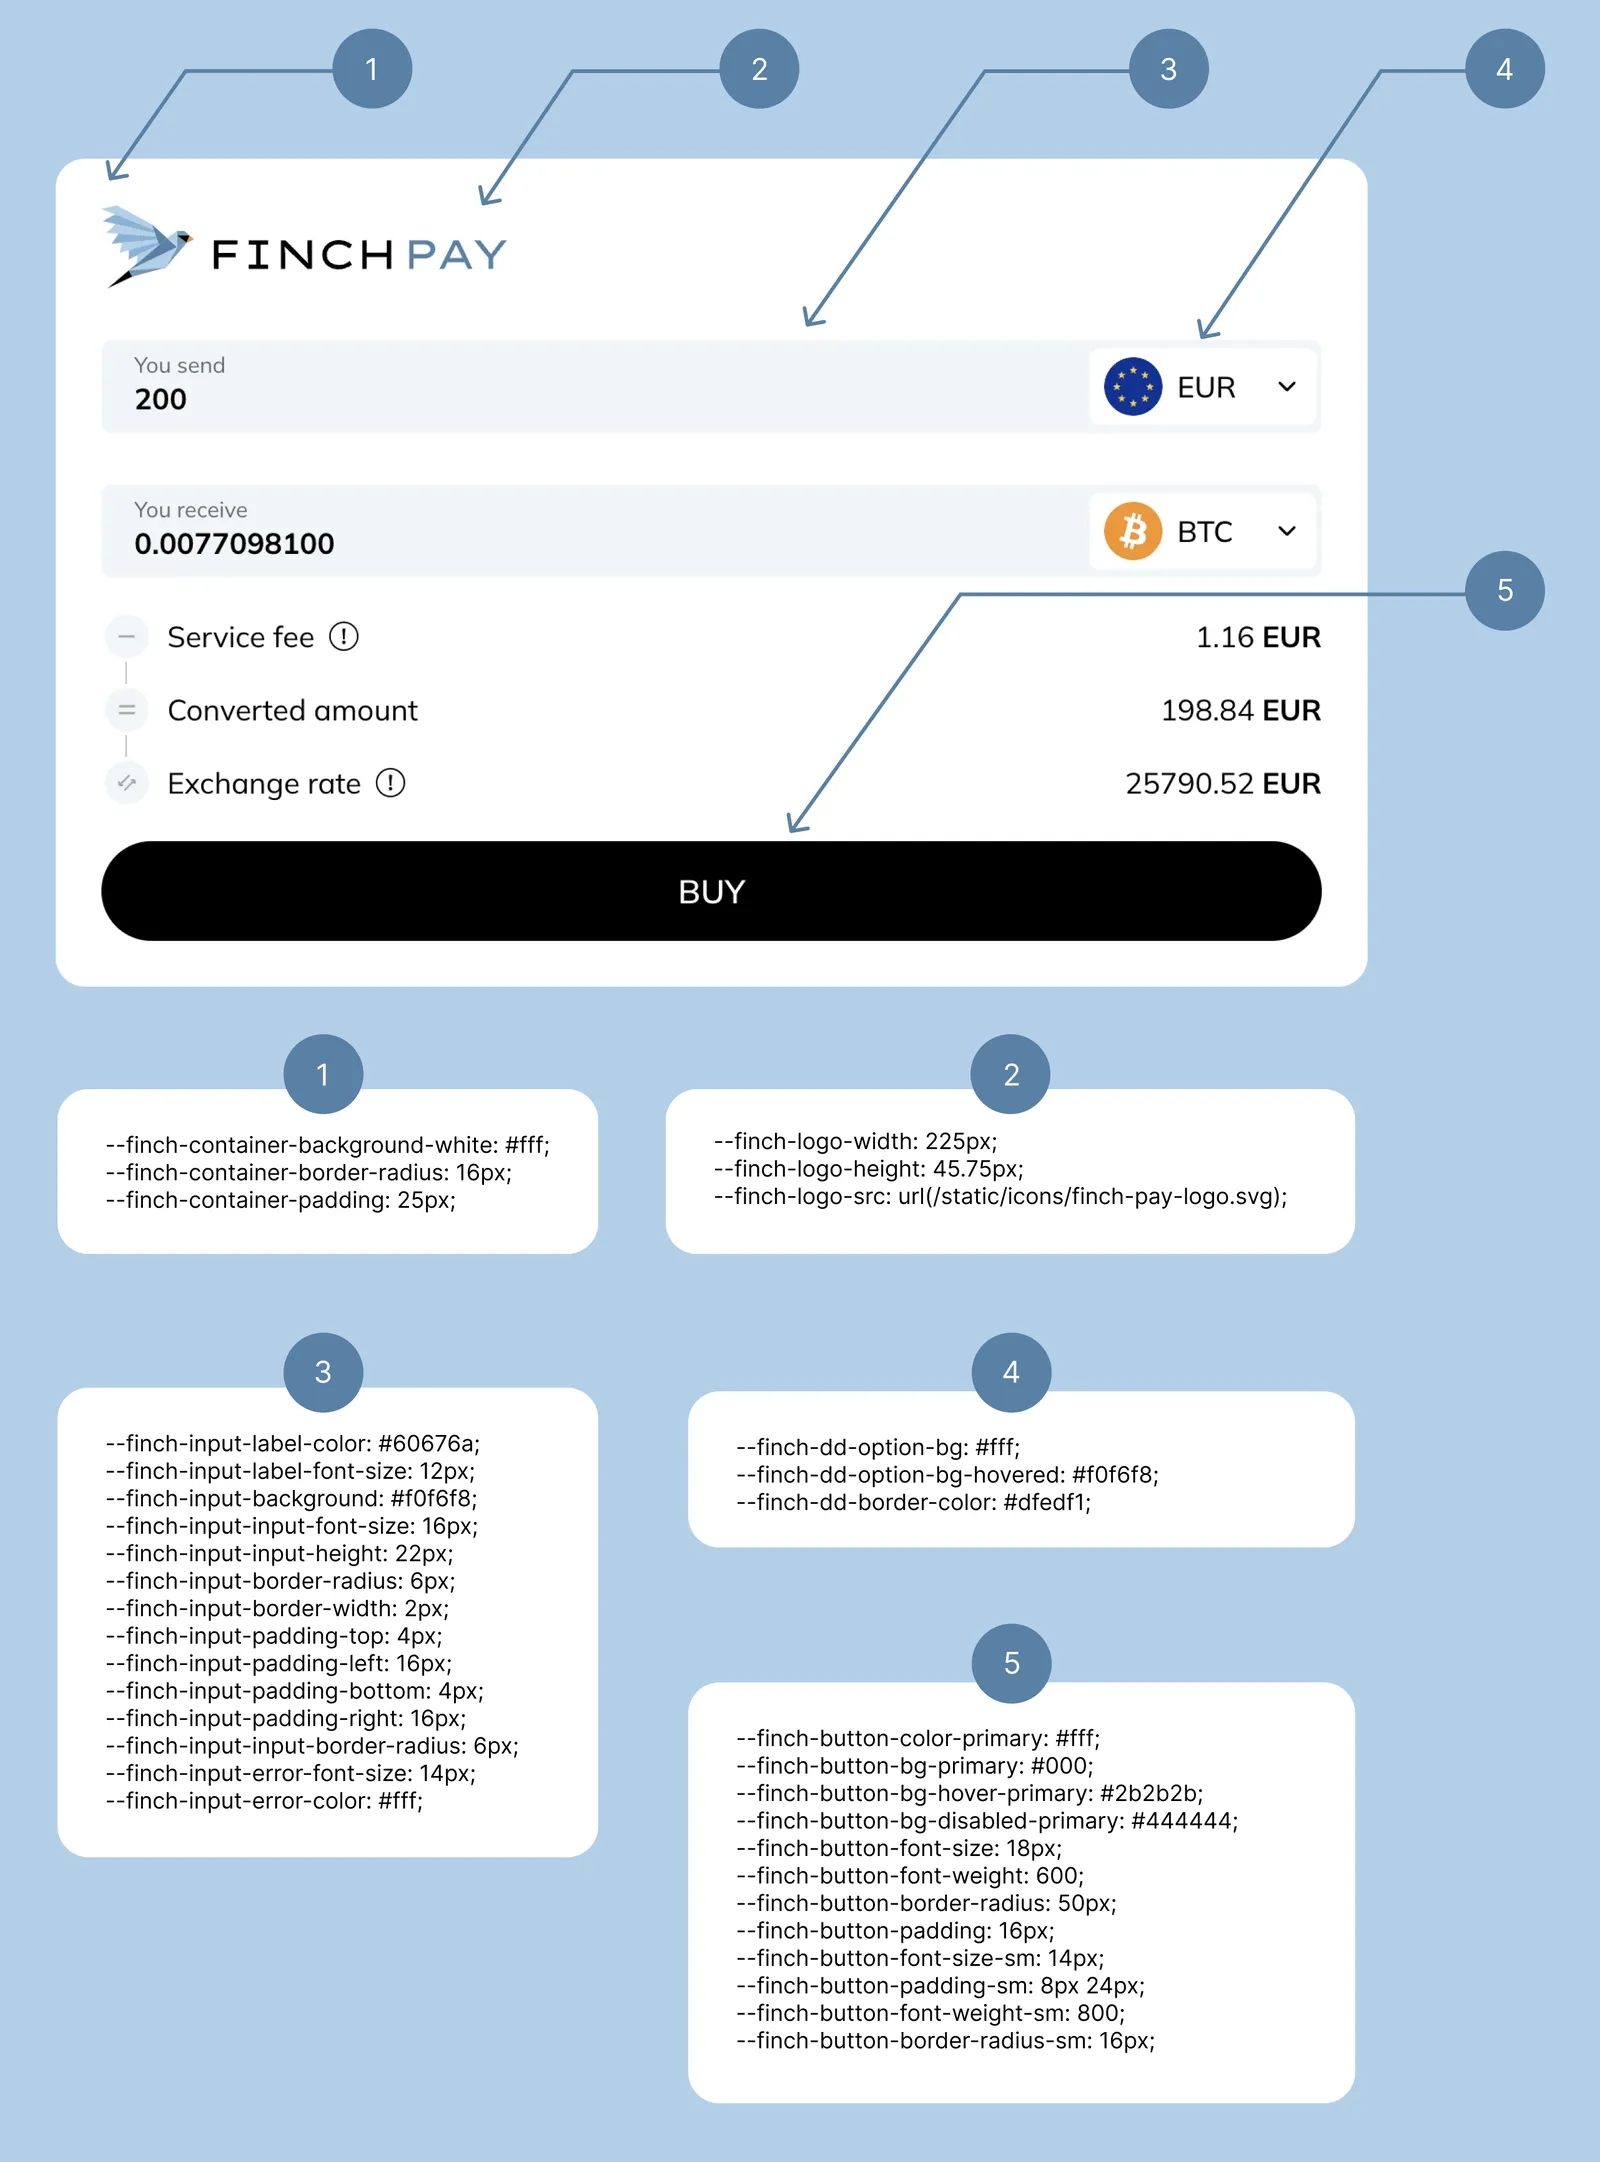
CSS. The widget comes with a default theme. You have the flexibility to override the default CSS variables and achieve a seamless UI integration with your website. Below are the CSS variables you can modify.
#finch-widget-container {
  --finch-spacing1: 2px;
  --finch-spacing2: 4px;
  --finch-spacing3: 8px;
  --finch-spacing4: 12px;
  --finch-spacing5: 16px;
  --finch-spacing6: 24px;
  --finch-spacing7: 28px;
  --finch-font-size-4: 16px;
  --finch-font-size-3: 14px;
  --finch-font-size-2: 12px;
  --finch-black1: #000;
  --finch-dark1: #111;
  --finch-gray1: #4d5254;
  --finch-gray3: #8c9497;
  --finch-red1: #e45a5a;
  --finch-container-background-white: #fff;
  --finch-container-border-radius: 16px;
  --finch-container-padding: 25px;
  --finch-input-label-color: #60676a;
  --finch-input-label-font-size: 12px;
  --finch-input-background: #f0f6f8;
  --finch-input-input-font-size: 16px;
  --finch-input-input-height: 22px;
  --finch-input-border-radius: 6px;
  --finch-input-border-width: 2px;
  --finch-input-padding-top: 4px;
  --finch-input-padding-left: 16px;
  --finch-input-padding-bottom: 4px;
  --finch-input-padding-right: 16px;
  --finch-input-input-border-radius: 6px;
  --finch-input-error-font-size: 14px;
  --finch-input-error-color: #fff;
  --finch-logo-width: 225px;
  --finch-logo-height: 45.75px;
  --finch-logo-src: url(https://finchpay.io/static/icons/finch-pay-logo.svg);
  --finch-dd-option-bg: #fff;
  --finch-dd-option-bg-hovered: #f0f6f8;
  --finch-dd-border-color: #dfedf1;
  --finch-button-color-primary: #fff;
  --finch-button-bg-primary: #000;
  --finch-button-bg-hover-primary: #2b2b2b;
  --finch-button-bg-disabled-primary: #444444;
  --finch-button-font-size: 18px;
  --finch-button-font-weight: 600;
  --finch-button-border-radius: 50px;
  --finch-button-padding: 16px;
  --finch-button-font-size-sm: 14px;
  --finch-button-padding-sm: 8px 24px;
  --finch-button-font-weight-sm: 800;
  --finch-button-border-radius-sm: 16px;
}